Showing posts with label remodel. Show all posts

Thursday, December 13, 2007

Details, Details!

Joe has installed the countertop, but we're still waiting for the back splash, doors, drawers, cubbies, and shelves... At this point I have my doubts they will be installed before we leave.

We were able to install the sink, however, and Jobe temporarily put the faucet trim on so Jim and I can now brush our teeth in the bathroom. Interestingly, the new plumbing makes the water taste better in the bathroom than it does in the kitchen. Yay! No more midnight trips downstairs for a glass of water!! Wish there was an easy way to clean out the pipes/faucet... I replaced the aerator on the kitchen tap recently, but it made no difference in taste [I'm sure the water is cleaner, as far as bugs/mold goes, as the old one was disgusting!]

And due to the wildly popular response to the last round of 'action' photos [okay, so it was just one person...], here are a few more, plus the so-close-to-being-finished-it-is-killing-me vanity.


Monday, December 10, 2007

Paint, tile, and the joys of bathing at home


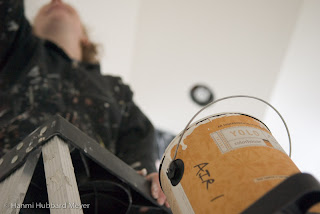
Okay remodel fans, we are in the home stretch. Last week our lovely friends Jane and Karen took care of all our painting needs. Karen traded a couple gallons of Yolo paint for one of my photos [though she hasn't decided which one yet!] and Jane took care of the painting, also in exchange for a photo. Barter rocks!

Joe has started to install the vanity, and as soon as the countertop and sink are in place we can finish up the plumbing.


And most importantly, we can now bathe in our own home! YAY! Last week I extolled the virtues of our new tub, but now I can confirm them. The material and it's heat holding capabilities are divine! Our first bath lasted nearly 90 minutes, and not once did we need to warm up the water. In fact, for a while we were too hot, having become accustomed to our old steel tub that had an instant cooling effect on water. We both had plenty of room, and I giggled with delight at the fact that I was able to submerge myself completely, up to my chin without resorting to contortions. Our one complaint is the durability of the toe-tap drain... A sideways bump is apparently all it takes to break off a piece and render it useless. Luckily they include an old fashioned stopper on a chain, so we were able to change it out painlessly. But having a chain in the tub with you is less than ideal, so I'm hoping the company will replace the broken part. Well, I just phoned and without even being placed on hold or transfered once, they are shipping a replacement part out today! Wonderful!!!


As we are fast approaching our trip to Chile [we leave Saturday], we're in a mad rush to get things wrapped up so our friend Susan can house sit and not be inconvenienced by a partially functional bathroom. We've had little trouble in terms of ideas working out up till now, but it became abundantly clear that our plan to use glass or Lumicor as a full shower surround was going to be prohibitively expensive. I also didn't like that we would have had to use a flavor of Lumicor that would at most contain 25% recycled content. So I opted to research my other lead and met with Marilyn Farrier, the owner of AMDEC Recycled Glass Tile. She works out of her home and uses large kilns to fuse 100% post industrial waste into gorgeous glass tiles. And her pricing simply cannot be beat. But more than that, from the first time I contacted her she has been very quick to respond, super friendly, and just has that something that makes you want to do business with her. After getting the grand tour of her production facility [her garage!], we packed up a few samples for me to share with Jim to narrow down our color choice. We selected Robin's Egg Blue with Green Apple accents in a 4x4" field tile. And better still, we found a great tiler, who will get it done for us as soon as the tile is ready!


Sunday, December 02, 2007

More photos from the Great Bathroom Remodel...

With the rain pouring down in buckets here and not quite having enough time to do the floor before the drywall squad returns to sand on Monday, we're taking a day off... So I've done some more digging and found/taken some more photos to post.

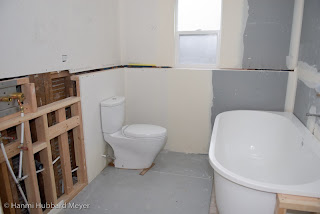
The new toilet went in yesterday, the tub is in place, though not yet connected to the drain, and the tile backer is ready for the floor heater and slate tile.

V+A "Nice" tub. As in the city in France... though it is very nice indeed

The room with natural lighting, on a dark and stormy day.
As we've mentioned previously, we're doing our best to be as "green" as possible. And while that's a very in vogue concept, it's actually still a bit difficult to find reliable, comprehensive resources for specifying materials and products. As such, the biggest pain has been in the amount of time it takes to figure out whether or not something is truly green, or just jumping on the bandwagon and using buzzwords to sell more garbage.

UltraTouch Recycled Cotton Insulation

Our lovely new toilet: dual flush with either a .9 gallon or 1.6 gallon flush, a HUGE improvement over the 1973 7 gallon per flush predecessor.

Then again, since I am blissfully under-employed, I've had the time to really dig in and have made some great finds. Here's our "green list" [subject to updates, as it's unlikely I'll remember everything in one go!]:
There are a few areas that are woefully barren of green products... among them bathtubs and faucet fixtures. Our decision to use the Victoria+Albert tub was based on aesthetics, yes, but also on its durability, size, and material. The size is such that two people can comfortably bath together, thereby conserving water. The material is a solid surface with the marketing label "Englishcast". Made from volcanic limestone and resin, the material is cast into one of their many tub styles. This creates a tub that is as strong as cast iron but at half the weight with the bonus of being renewable, easy to clean without chemicals, and keeping the bathwater warm longer than other materials. We have yet to bathe in it, but we love the tub so much that if we ever move, I'd be really tempted to take it with us...

Other materials we are still considering are AMDEC Recycled glass tile and/or Lumicor panels for the tub/shower surround. Both are Northwest based companies with local manufacturing from recycled materials.

Later this week we will be trading artwork for labor and materials when the painting party starts. We have some pretty awesome friends. :)

Thursday, November 29, 2007

drywall up... and it's good!

The drywall is finishing up and the mud is drying. Things are finally looking like a room. We spent 2 weeks on/off putting the drywall up, then had some great folks come in to finishing up and tape/mud. We'll be putting in the floor this coming weekend - very exciting!


Above is the tub corner, where the vent comes down and the plex piping goes up is lower than the lip of the new tub - it's a high lip! I suspect we may up a step next to the tub at some point, but we'll have to see. [What Jim means is that we may need to install a step to get into the tub in the future... -h2m]


The skylight, with the walls finally shaped and mudded, is just wonderful. For a long time, it was questionable if the angles would conform to make a nice alcove. I'm happy to report that it all worked out.

Friday, November 02, 2007

Remodel Pictures

If you read the last post, you know I owe you all some photos, so here's a few of the better ones. There's a difficulty in taking good photos with a small space but we wanted to walk through a bit of the experience visually:


So this is what we started with. Eh, it was awful.


We've both built little things in the past, and with Hanmi's expertise in industrial engineering (shes a powerhouse of skills) and my common-sense about tools ("Oh! thats sharp! do you have a bandage?") we were determined to try this ourselves. We figure if we messed up, it'd only be more money. Money is a silly thing to try and take a bath with (I think you end up dirtier), so it was obvious, we'd trade some money for a better bathroom.

So we made a long list of the things we'd have to to. They included:

  • Remove everything.
  • Remove everything the above was sitting on.
  • Remove the walls and ceiling
  • Remove the floor
  • Cut out all things electric, wires, plumbing, gas lines (isn't your house lit with gas lights?)
  • Kills bugs, mold, remove rot, repair all structural elements
  • Make a new electric load plan and map
  • Add breakers in basement, run wires to attic, drop to rooms
  • Add skylight (hired out)
  • Frame in alcove for open ceiling, including soffit for lights (hired out)
  • Install wiring, fan, lights, switches, outlets, test electric.
  • Run plumbing (hired out)
  • -you are here-
  • Install new subfloor, floor, heating elements, tile. Cover with plywood
  • Install toilet
  • Install insulation
  • Install all drywall. Finish drywall.
  • Install surround, tub.
  • Install mirror, vanity light, vanity
  • Paint walls
  • Install finish trim, paint.
  • Install plates, etc.


Anyway, this is the short list. Each step has lots of details, a few special tools and a clean up afterwards. We've filled the dumpster, taken extra loads to the dump ourselves, taken from and given to the rebuilding center, bought tons of tools and met quite a few good and handy friends.

It's been great, and we're about halfway on the list, but certainly through the slowest portion of it. Our biggest roadblock is our own time and perseverance. However - when you have to go down the street to the tavern to poo you realize that one cannot live like a barfly forever.


discoveries and plans


So, after work, we slip into the itchy dirtbag clothes and don helmets, eyewear, earplugs and headlamps. Then we proceed to stare at stuff and finally dig through our bag of stuff and nail it to the walls. Overall, it kinda works out. Occasionally we pull it back off and move it, or bang a thumb but there's been no tragedies yet.

Here's a few more shots:


My last bath in the rustic setting. Extra bubbles please!


Framing comes together


Framing the soffit above the sink area


Making a map of the wiring is key to shocking yourself efficiently
(just kidding mom)


Our tenants begrudgingly packed up for another place.
Then we sprayed them in the face


Ooo! Exciting! Purple socks, new joists, drain and supply plumbing!


Crazy fun facts:
- 100 years ago, when our house was built, trees were made of iron and things were built by incredibly strong people who had no plastic, rubber or (i'm guessing) levels.

- For a while people didn't "trust" electricity (don't give it money, kids). So, they lighted their houses here partially with gas lamps and partially with electric lamps. The wires were wrapped in cloth. (oh, and they smoked in the house under all this). Coincidentally, these were the days when folks believed in spontaneous human combustion.

- What you don't know doesn't scare you. If you don't look down in that slot where razorblades used to go, you won't find the monsters. Do not remove your toilet until after lunch. Concrete backer board does not originally come in blue-green.

- If you give up doing something because you're confused and tired, just go to bed. You will have more time this weekend to be confused and tired.

- If you install something, always begin your day by playing with it for an hour. It'll give you confidence to install something else. Then you can play with two things, unless you messed up and have to rip one out.

- Putting in earplugs and simultaneously turning up the radio, then trying to sing over the noise of the miter saw does *not* prevent hearing damage. Your neighbors may think there's someone being tortured in the house.

- When moving heavy things up and down stairs, always say "ready?" at least 5 times before doing anything. If something happens before the 5th call, state that you weren't ready and proceed to lift.

- If you have neighbors that don't fill their garbage cans to the brim, run around on trash night and deliver your own construction refuse into their cans like a mad construction-costumed kris kringle.


Our new tub. It's gigantic!

Stay tuned for more news from the front in the next few weeks. Cheers!

Monday, October 22, 2007

Remodel Remarks

Well, it's sure been a long time since a real adventure. We're due! Our summer was a long slog through the world of software (for me) and photography (for Han). Now thats over, we thought we'd "spice things up" with a little home remodeling! Hoboy, this was big deal.

So, we live in a 1397sq ft 2x4 Douglas fir Portland "Craftsman" bungalow built in 1909. It has one bathroom. That bathroom has been remodeled at least 2x since initial construction. So, we decided to gut it to studs, rip everything out, blow the ceiling out to the roof, put in a skylight and rewire using new breakers in the basement. We "broke wall" in September.

some tidbits:

  • If you store boxes in your attic, like the owners of this house, some things fall out. Over 100 years, thing makes for an interesting collage of treasures, army patches, christmas ornaments, newspaper clippings. Be an archaeologist in your own home!

  • If a prior remodel was done by a DIY'er with little experience except shop class, be prepared for a battle royale. Our demolition was a fight because the furniture was built in place and screwed into the wall, floor, ceiling, wherever! Not with just mounting screws or nails, but LAYERS of glue, nails, 4" screws, lag bolts, and varnish [oh my!]. Repeat several times. It was...bizarre!

  • Once a house reaches 100 years old in the active-volcano-land of the Pacific Northwest, throw away your level, T-square and speed square. There are no flat surfaces, no 90-degree corners and no "solid" places. Creaks, squeaks, leaks and ages of history. You may find your old plumbing (galvanized) next to your other plumbing (copper) next to the other plumbing (CPVC).

  • Little did I know that not only do we have a wasp nest in one area, but several decades of history of wasps in different areas, a few joists that fed ants of long ago, and a few live carpenter ants (carrying larvae to a new location to get away from the hammering). Bird nests, squirrel stashes, spider webs. Indy! Look here! Asps!

  • If all that isn't enough, mapping out the circuits of the house via wire tracing and circuit testers is fun too! Start with a floor diagram, then identify all the outlets, lights, and switches, then run around and turn them on/off, use a wall-tracer and finally connect them up. Luckily, I was able to crawl through asbestos and fiberglass for most of it, following wires into and out of junction boxes in the attic. Wheee!

  • Which brings me to a request: Please don't see the opportunity to put so many 12-gauge wires into 1 box. I found junction boxes with 2, sometimes 3 different circuits in them, with 5, 6 or 7 wires crammed into a ball. Thankfully, I'm fairly comfortable playing with wire. When the radio turns on when I open the fridge, don't ask me about it.

I'll post the pictures up here soon. Demo is over and now we're in the construction phase. Framing is almost complete, and all the new electric is in. We used almost 100ft of new/replacement wire. Han will give you a tour of all the new gadgets (skylight, fan, floor, towel rack, lights, dimmers, etc).

Friday, October 05, 2007

My, what a busy summer!

It's officially fall here in Portland. The chickens are pretty much full grown, [we'll be looking for eggs in the next month or so], the pumpkins have been harvested, the last of the tomatoes are slowly ripening, the bathroom has been gutted and the remodel is in full swing, we've renewed our climbing gym memberships, the fenders are back on the bikes, we've been eating figs off neighborhood trees and checking the fallen chestnuts for little treasures.

Jim has been working very hard and very long hours over the summer, so our adventuring has been minimal. Instead we've put a lot of energy into projects in and around the house: a new roof for the deck, gardening, and the bathroom remodel. The demolition began 3 weeks ago, and the skylight is being put in as I write. The framing of the new lofted ceiling/walls has begun and almost all of the components and fixtures have been ordered. Where we could we've bartered with friends to keep costs down and keep the money "in the family". We're going as green as possible--to the point that it hurts at times! It's been a lot more work to research and specify truly green products, but it is worth it. In most cases we're actually saving money over the conventional route. We're doing our best to keep it local, too. I'll do another post later with all the details and final specs and, of course, photos. Today I just wanted to post a quick update to let you know all is well.

I've been getting several requests for portrait work, and in fact have one this weekend in Seattle with my friend Lisa. Once the remodel is done, I'll be able to focus on building a business. But for now I've dusted off my design hat and busted out my tape measure and clipboard and play Designer/General Contractor most days and evenings. It's actually been pretty fun, and in spite of all the dust and inconvenience of taking our only bathroom to the studs, it hasn't presented too much hardship. We still have a working toilet and tub, but eventually everything will need to come out to do the floors, which is when I expect we'll have a couple of rough days. But our neighbors have offered to let us use their bathrooms and we can shower at the climbing gym, so it shouldn't be too bad.

Now I'm off to order lights, call the plumber, and go to Pro Photo Supply...